Configuration & Instructor User Guide
XperienceED (XED)
Client - facing guide for configuring XperienceED as an external tool in Moodle, linking course content, synchronizing users, and exchanging grades.
Note: This guide assumes the Moodle administrator has permission to manage external tools and that the target Moodle course already exists.
1. Introduction
This guide explains how to connect Moodle with XperienceED using LTI 1.3 (LTI Advantage). The integration allows Moodle users to launch XperienceED content from a Moodle course, associate the Moodle course context with an XperienceED group and course, synchronize course members, create gradebook line items, and send grades from XperienceED to Moodle.
The setup is completed in two stages:
- Platform configuration: register and activate XperienceED as an external tool in Moodle. This requires Moodle administrator privileges.
- Course configuration: add XperienceED to a Moodle course, link the appropriate XperienceED group/course and content, synchronize users, and configure grade synchronization.
Roles and responsibilities
- Moodle Administrator: registers and activates the external tool, verifies LTI settings, and provides the generated Client ID to the XperienceED administrator.
- XperienceED Administrator: associates the Moodle platform/deployment with the appropriate XperienceED center when required.
- Instructor: links the Moodle course to an XperienceED group/course, synchronizes learners, selects content, and configures grade items.
Note: The screenshots in this guide are examples. Course names, usernames, Client IDs, and other instance-specific values will differ in your environment
.
2. Prerequisites
- A Moodle account with administrator privileges for the platform-level configuration.
- An existing Moodle course in which XperienceED will be added.
- Access to an XperienceED account, or the ability to create one during the first LTI launch.
- The XperienceED dynamic registration URL: https://xperienceed.com/lti/register
- Contact with your XperienceED administrator for center/platform association when required.
3. Register XperienceED in Moodle
Note: This section is performed by a Moodle Administrator
3.1. Open External Tool Management
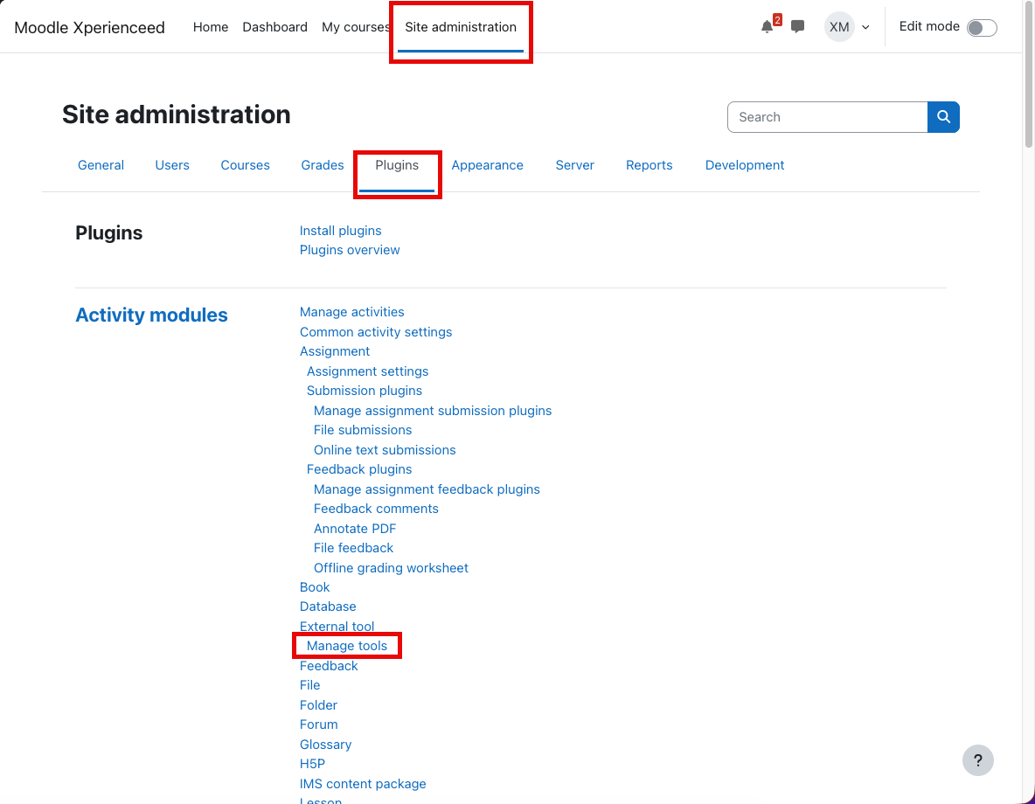
1. Open Site administration. From the Moodle top navigation, select Site administration.
2. Open Plugins. Select the Plugins tab.
3. Open Manage tools. Under Activity modules > External tool, select Manage tools.
3.2 Start Dynamic Registration
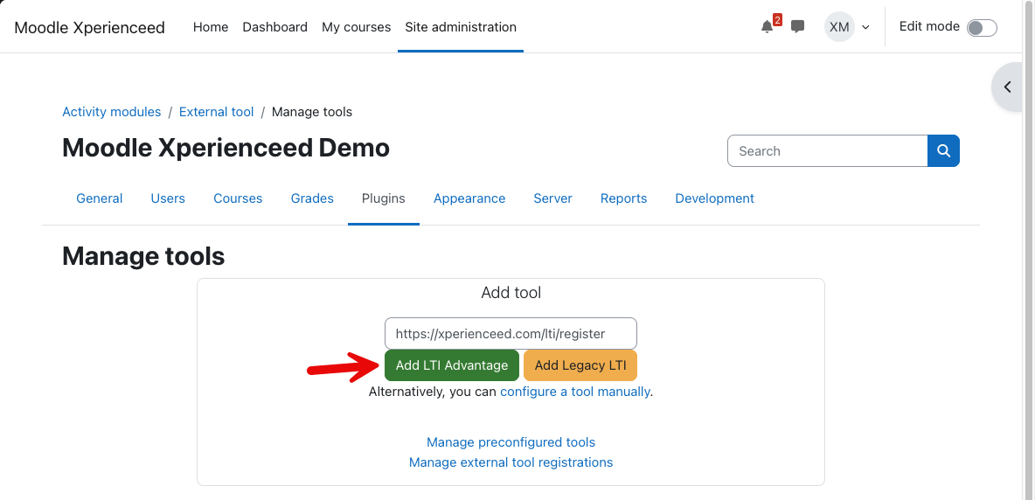
In the Add tool area, enter https://xperienceed.com/lti/register and select Add LTI Advantage
3.3 Activate the Registered Tool
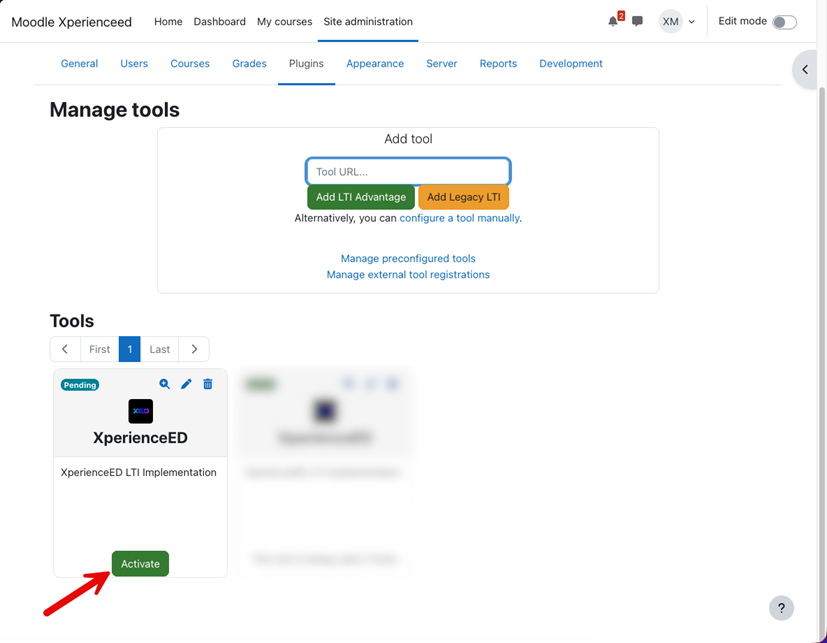
After dynamic registration completes, XperienceED appears in the Tools list with a Pending status.
1. Locate XperienceED in the Tools list.
2. Click Activate. The tool must be activated before it can be used in courses.
3.4 Open the Tool Configuration
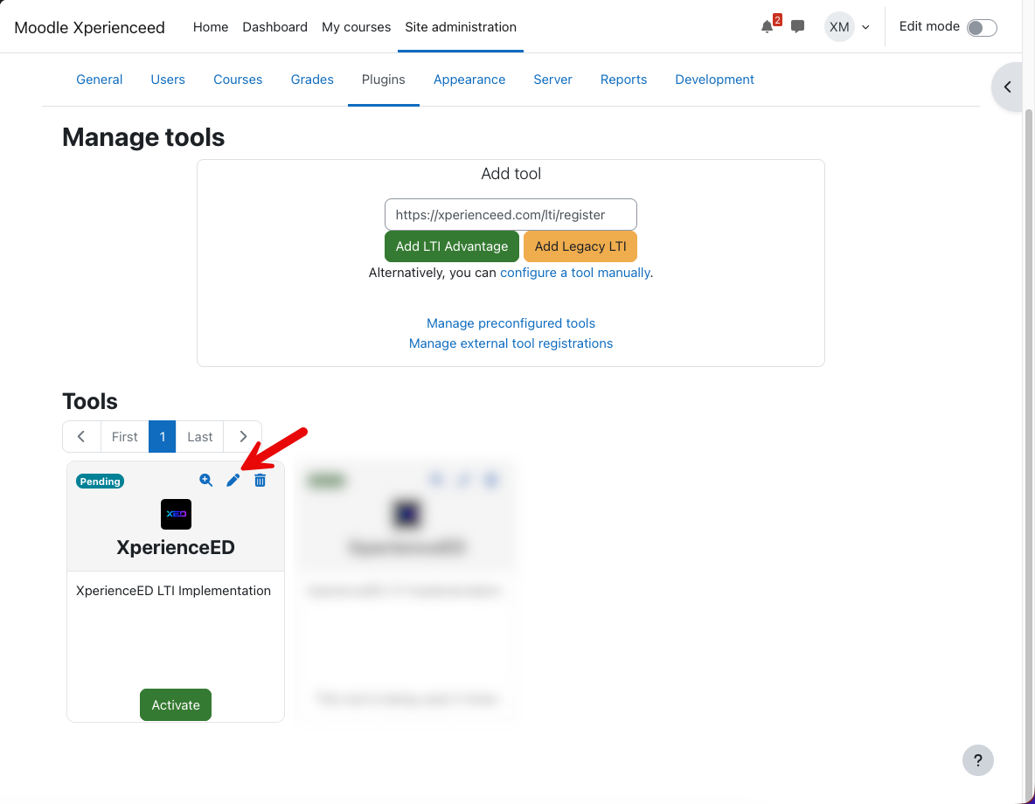
1. Click the Edit icon for XperienceED. This opens the complete tool configuration where the Client ID and LTI service settings can be reviewed.
4. Verify the XperienceED Tool Settings
4.1 Record the Client ID and Verify Tool Settings
On the Tool settings page, review the values generated by the LTI registration. Pay particular attention to the Client ID. The Client ID uniquely identifies this Moodle registration and must be provided to the XperienceED administrator so the Moodle platform can be configured on the XperienceED side.
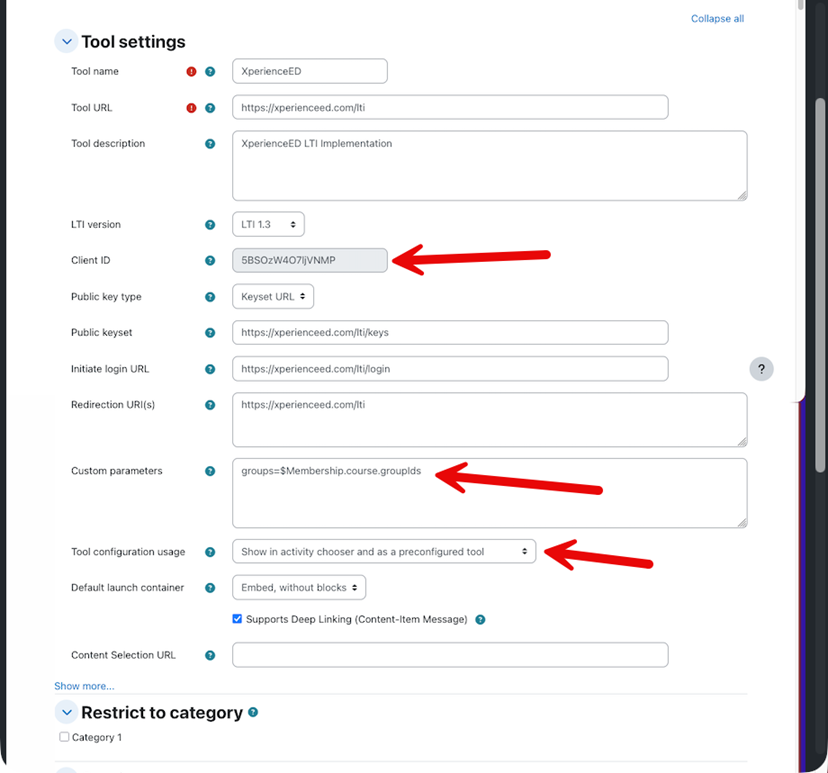
IMPORTANT Note: Provide the ClientID shown in your Moodle instance to your XperienceED administrator. Do not copy the Example ClientID from this guide.
- LTI version: LTI 1.3.
- Custom parameters: groups=$Membership.course.groupIds
- Tool configuration usage: Show in activity chooser and as a preconfigured tool.
- Supports Deep Linking (Content-Item Message): enabled.
5. Verify Services and Privacy
Scroll to the Services and Privacy sections and confirm the following values:
- IMS LTI Assignment and Grade Services: Use this service for grade sync and column management.
- IMS LTI Names and Role Provisioning: Use this service to retrieve members' information as per privacy settings.
- Tool Settings: Do not use this service.
- Share launcher's name with tool: Always.
- Share launcher's email with tool: Always.
- Accept grades from the tool: As specified in Deep Linking definition or Delegate to teacher.
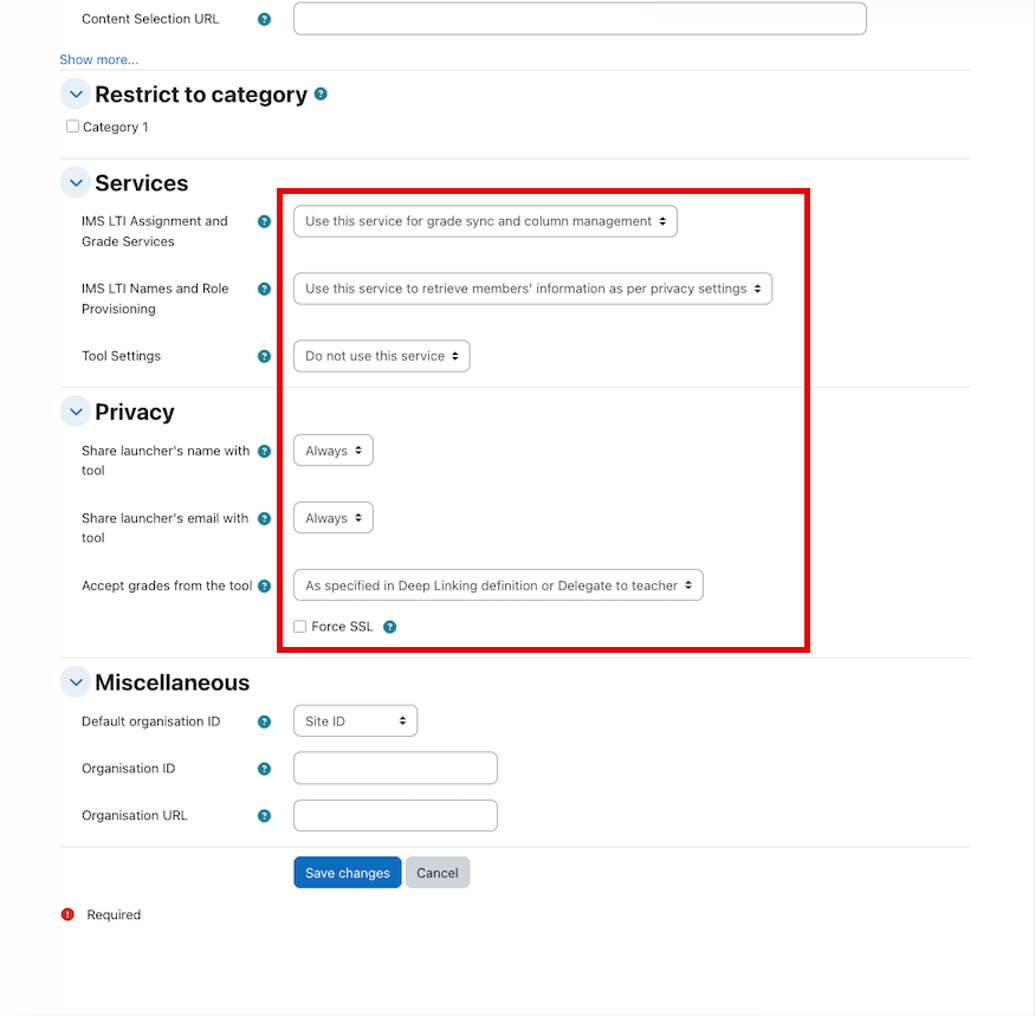
Click Save changes. Save the verified configuration before continuing.
6. Add XperienceED to a Moodle Course
6.1 Open the Target Course
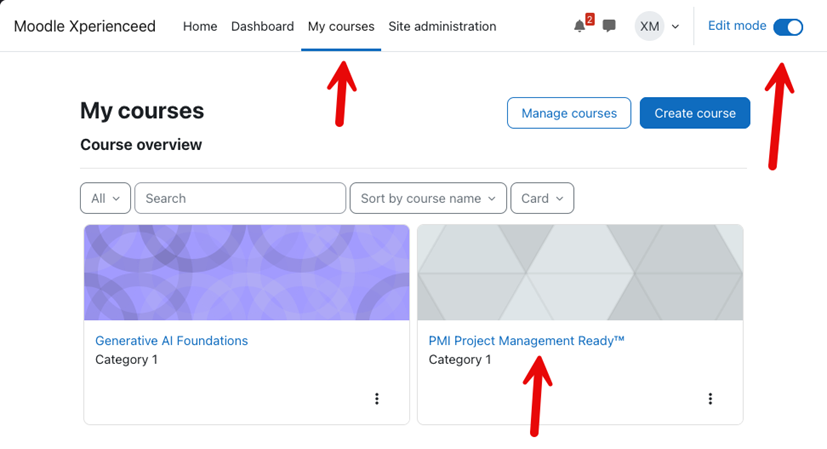
1. Open My courses and locate the course where XperienceED will be added.
2. Enable Edit mode.
3. Open the target course.
Click Save changes. Save the verified configuration before continuing.
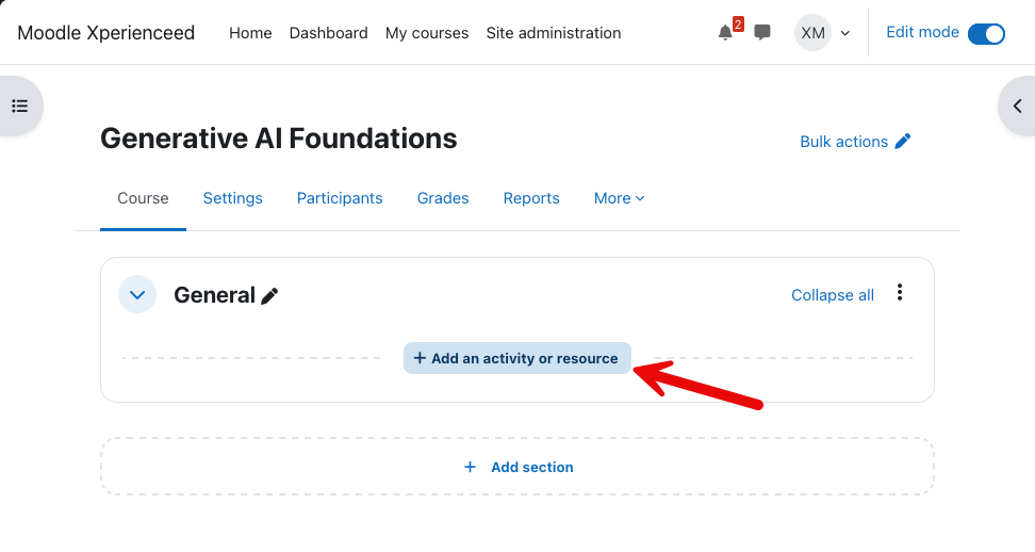
7. Add XperienceED to a Moodle Course
7.1 Open the Target Course
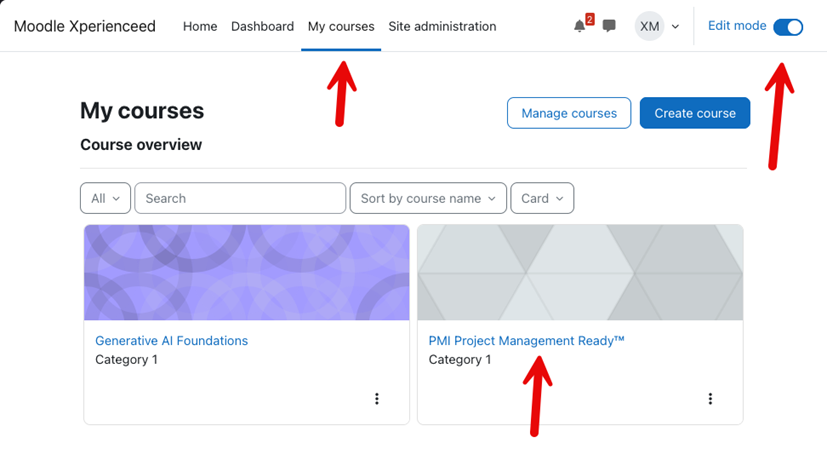
1. Open My courses and locate the course where XperienceED will be added.
2. Enable Edit mode.
3. Open the target course.
Click Add an activity or resource in the desired course section.
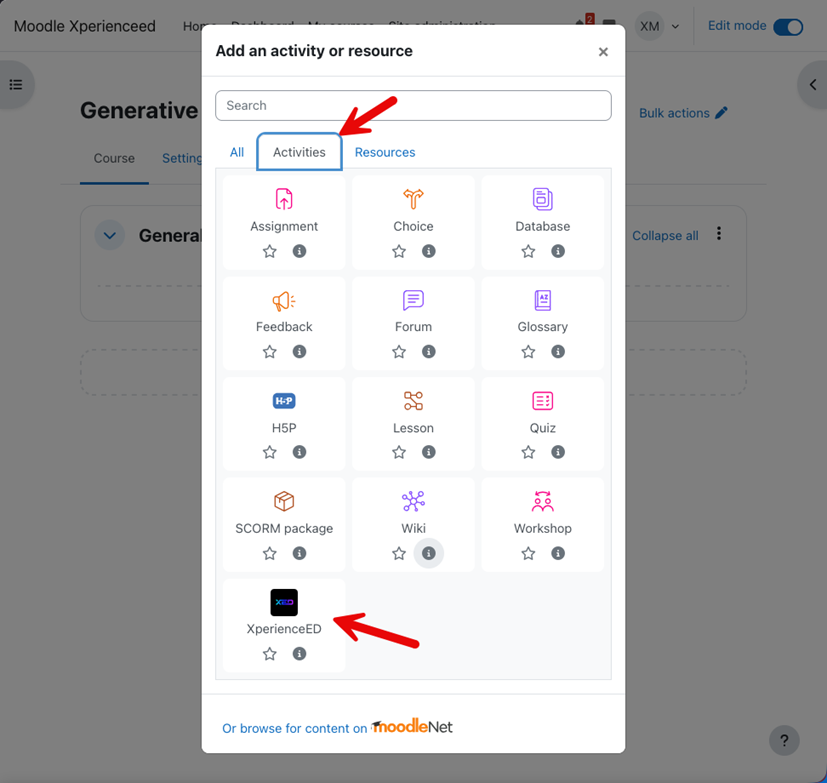
7.2 Select the XperienceED Activity
1. Select Activities in the activity chooser.
2. Select XperienceED.
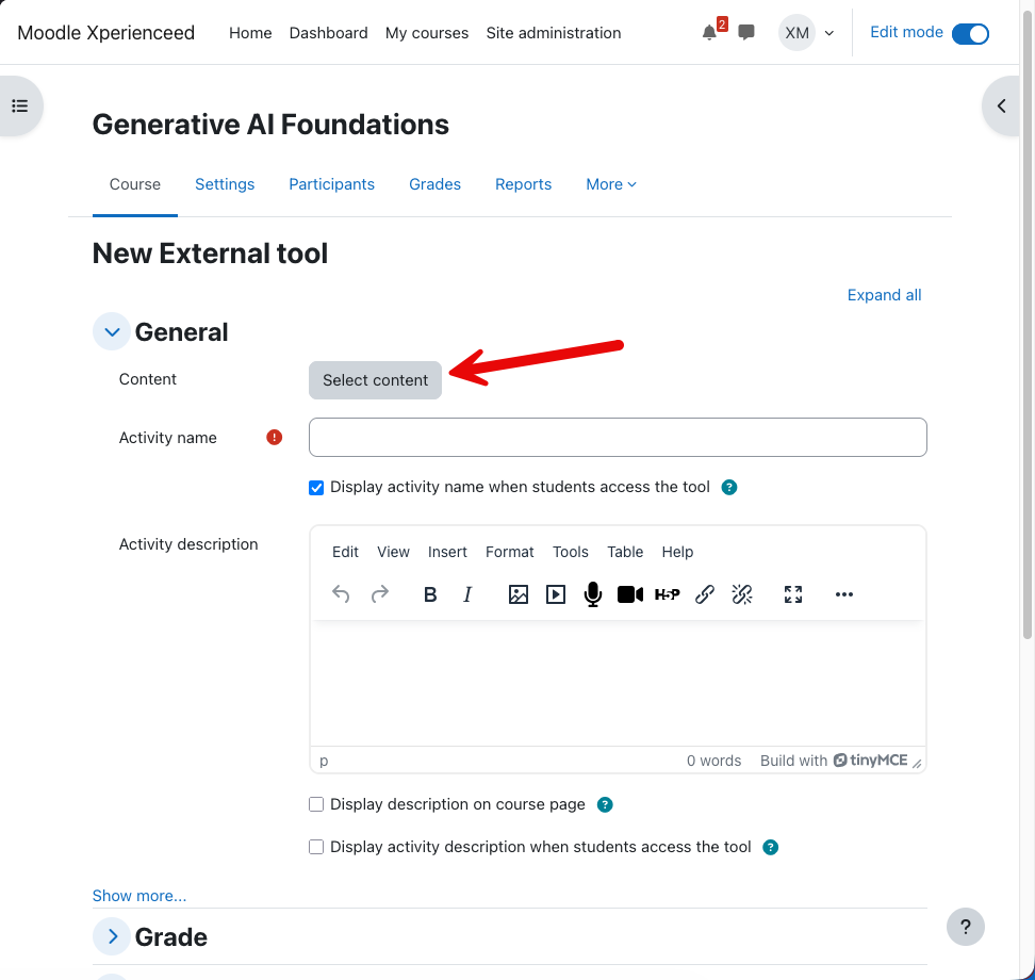
7.3 Open the XperienceED Content Selector
1. In the New External tool form, click Select content.
8. First-Time Account Setup
The first time a user opens XperienceED through the LTI content selector, XperienceED asks the user to establish the account relationship. Two options are available:
- Create New User Account: use the Moodle identity information provided in the form and define a password to create a new XperienceED account.
- Link Existing Account: sign in with the credentials of an existing XperienceED account to link it to the Moodle account.
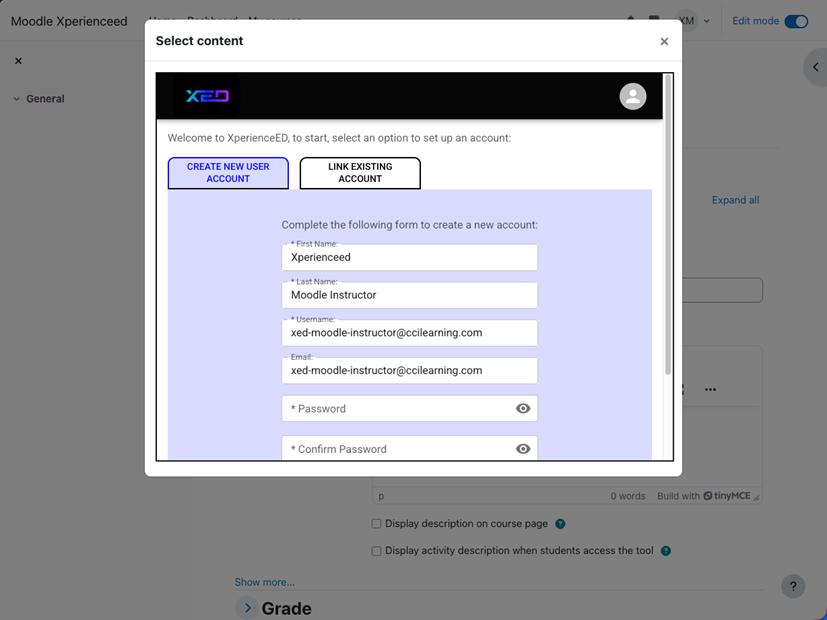
NOTE: If you choose Link Existing Account, you must know the credentials of the XperienceED account you want to link.
8.1 If the Moodle Platform is Not Yet Registered
If XperienceED cannot find a center or platform associated with the Moodle registration, a message displays the Platform URL, Client ID, and Deployment ID.
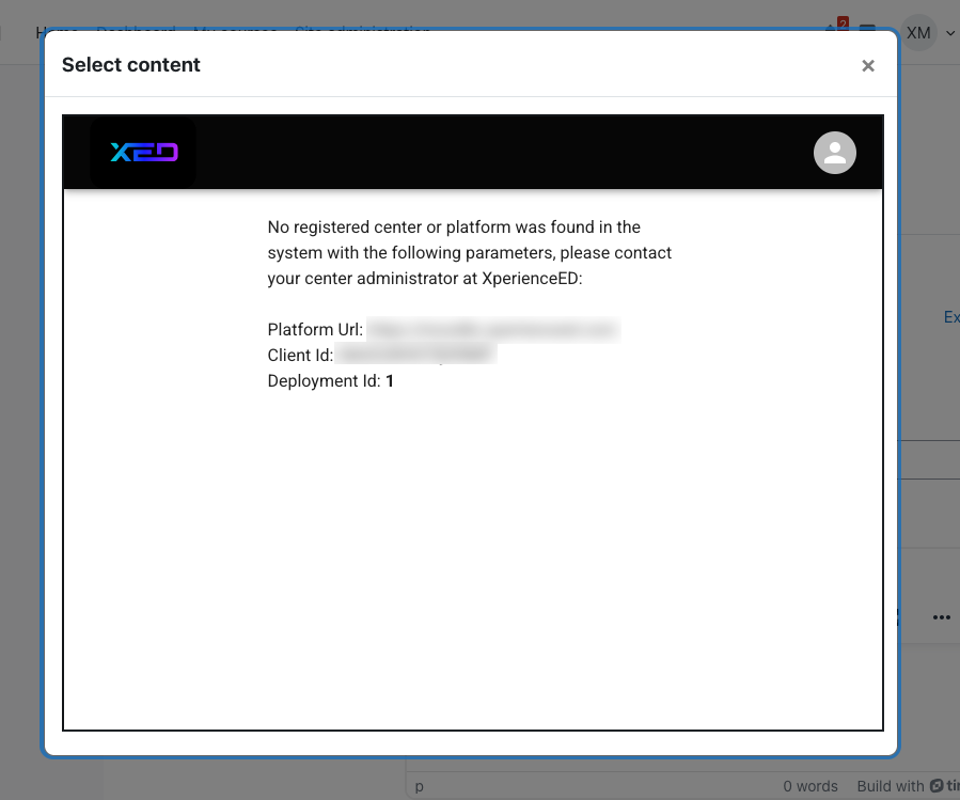
1. Contact your XperienceED administrator.
2. Provide the Platform URL, Client ID, and Deployment ID displayed on the screen. The XperienceED administrator will use these values to associate the Moodle instance with the appropriate XperienceED center.
3. After the association is completed, reopen or refresh the XperienceED content selector and continue.
9. Link the Moodle Course to an XED Group and Course
Before content can be linked, the current Moodle course context must be associated with an XperienceED group and one of the courses configured for that group.
9.1 Open Group Settings
If the Link Content screen reports that no group is associated with the current context, click Back to return to the XperienceED main menu.
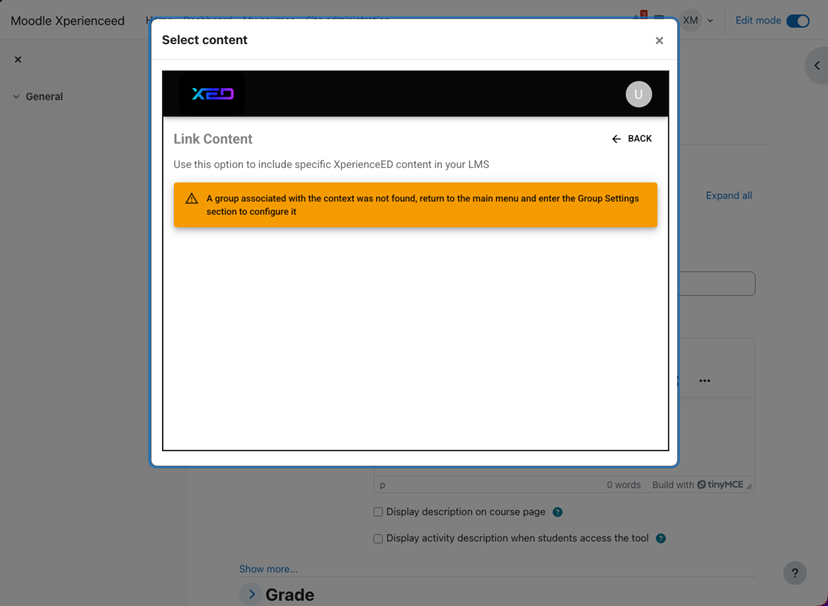
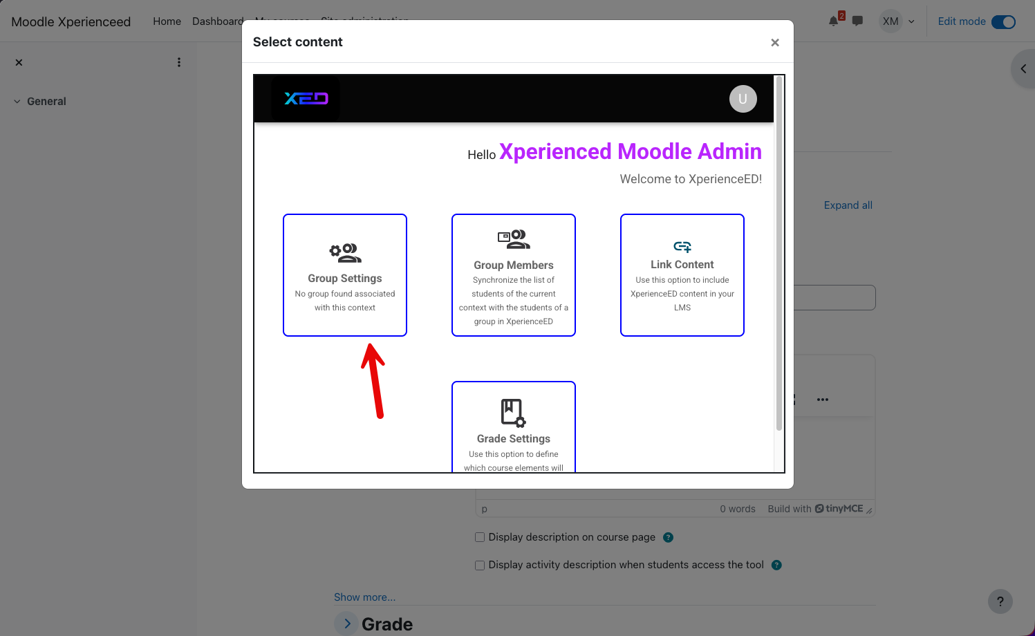
1. From the Main XperienceED menu, select Group Settings.
9.2 Create or Select an XperienceED Group
Group Settings displays the groups available to the signed-in XperienceED user.
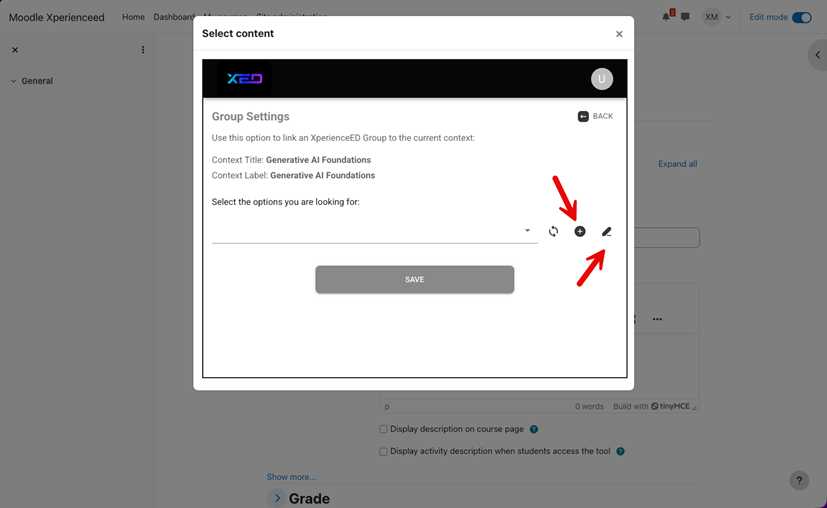
1. If the required group does not exist, click the plus (+) icon.
A new browser tab opens where you can create the XperienceED group and configure the courses assigned to it.
2. Create the group and configure its courses in the new XperienceED tab.
3. Return to the Moodle browser tab after the group and course configuration is complete.
9.3 Refresh and Link the Group
1. Click the Refresh icon to reload the available XperienceED groups.
2. Select the appropriate group.
3. Select the XperienceED course to associate with the Moodle course context.
4. Click Save.
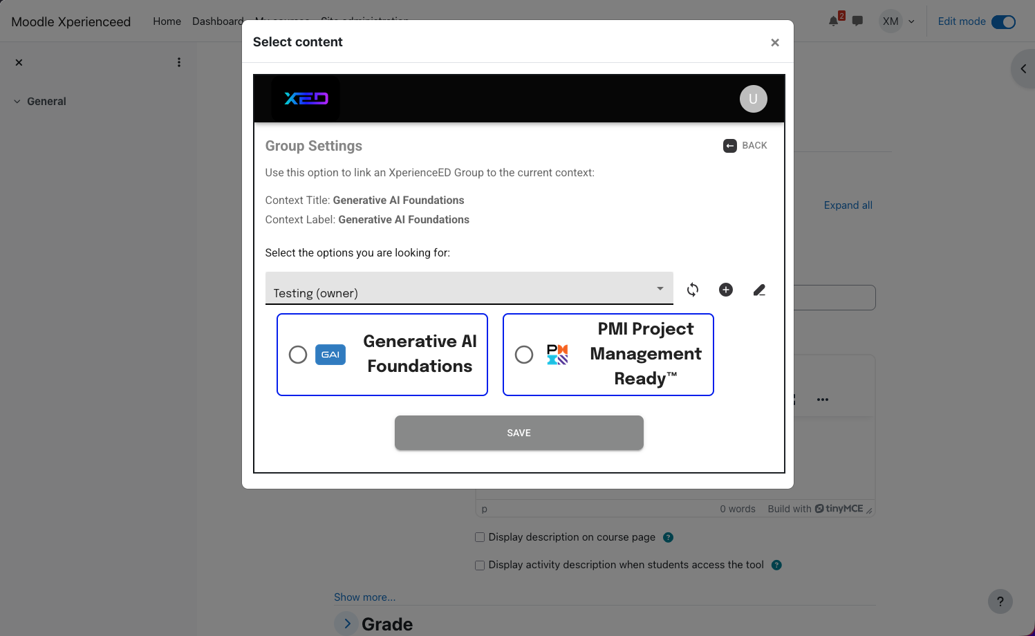
5. Click Back to return to the XperienceED main menu.
6. Select Link Content.
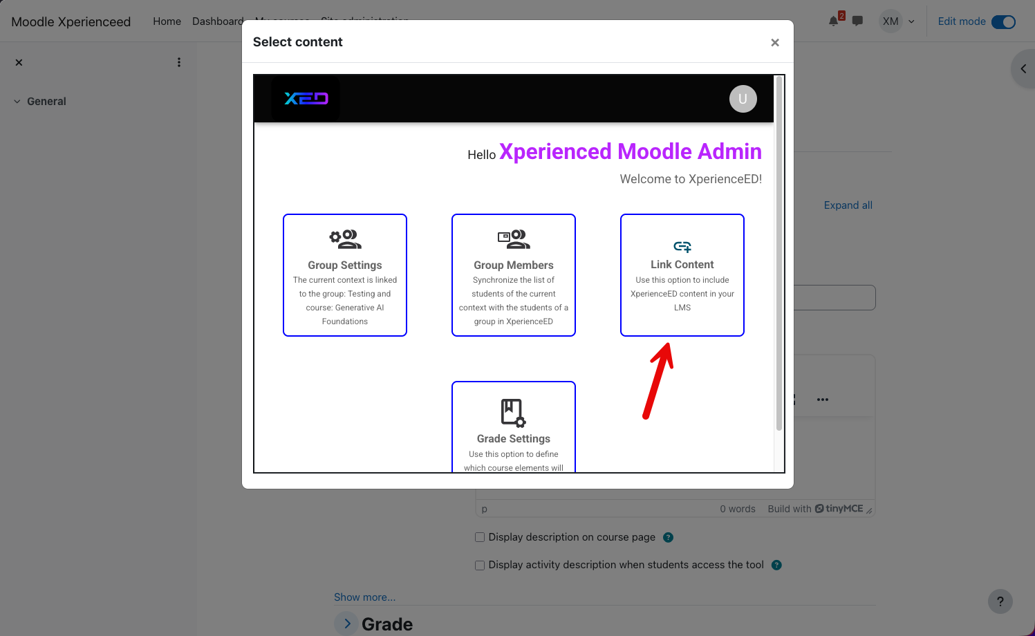
10. Link XperienceED Content
The Link Content screen provides two content types:
- Full course: links the complete XperienceED course to the Moodle activity.
- Specific content: links a specific item from the XperienceED course.
For a full-course integration:
1. Select Full course.
2. Click Submit.
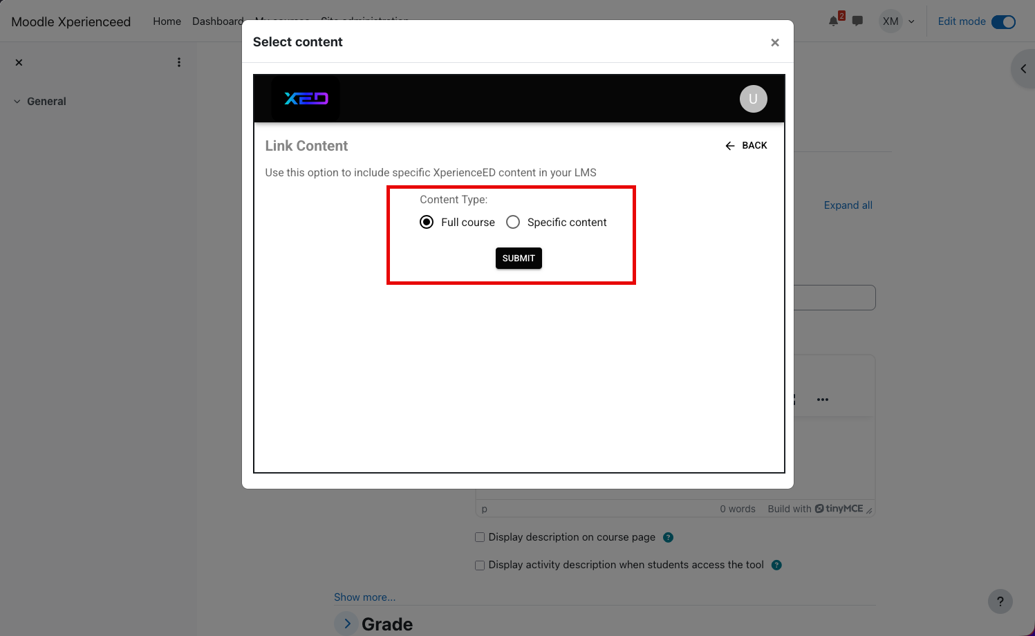
Moodle returns to the external tool configuration form and populates the activity based on the selected XperienceED content.
10.1 Enable Gradebook Integration
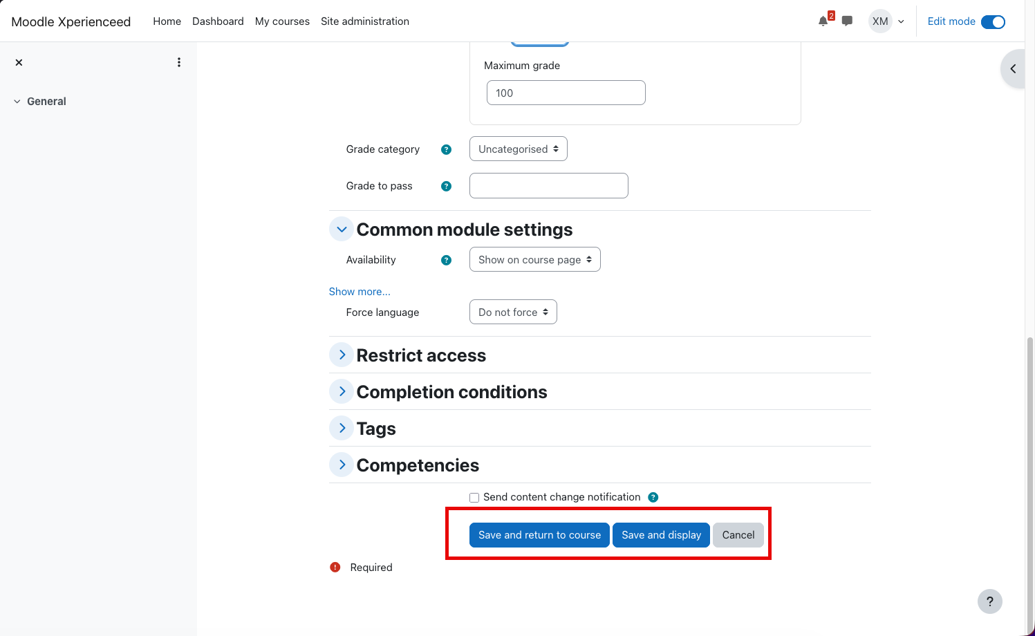
1. Expand the Grade section if necessary.
2. Enable Allow XperienceED to add grades in the gradebook.
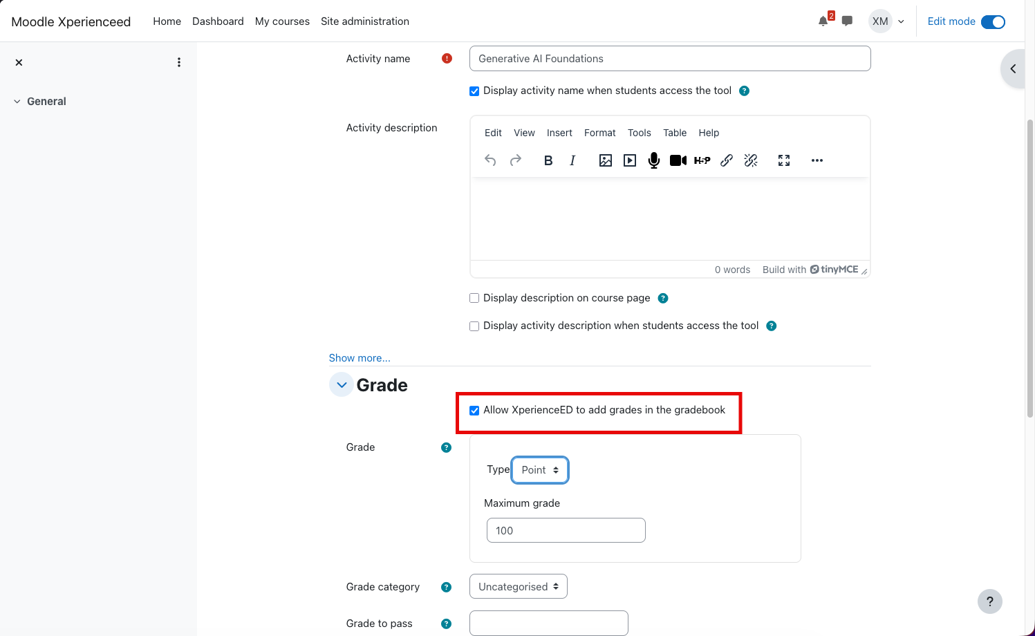
3. Scroll to the bottom of the form and click Save and return to course.
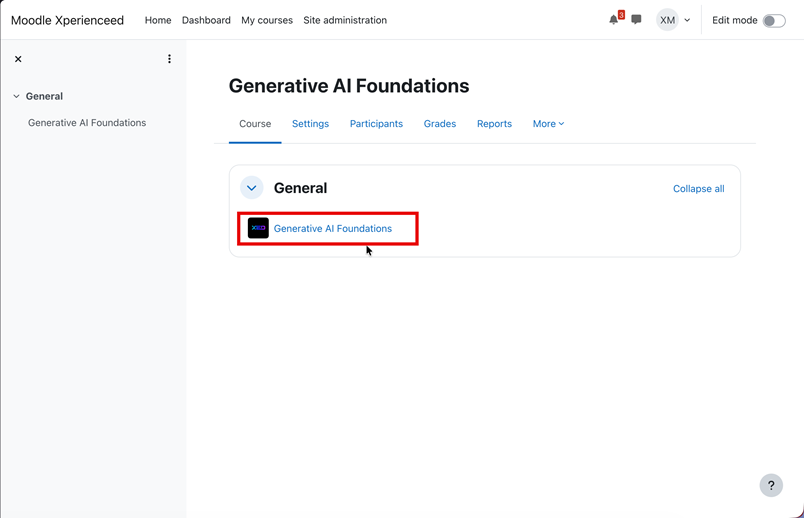
11. Open the XperienceED Activity
The Moodle course now contains the XperienceED activity link. Click the activity to launch XperienceED within the Moodle course.
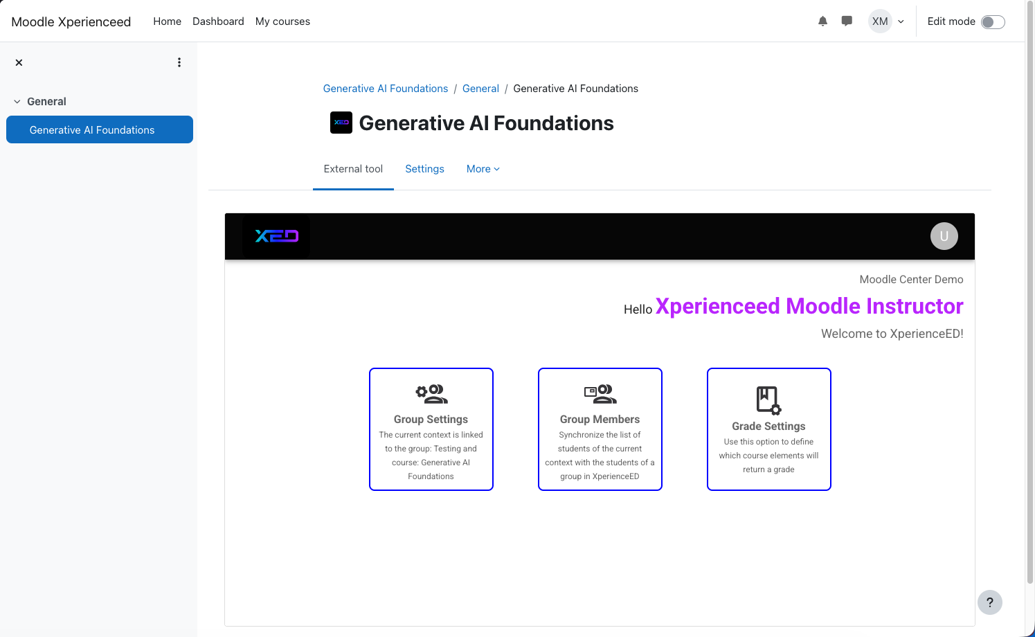
When an instructor opens the activity, the XperienceED instructor menu provides the following configuration areas:
- Group Settings: links the current Moodle context to a specific XperienceED group and course.
- Group Members: synchronizes Moodle course participants with users in XperienceED.
- Grade Settings: creates Moodle gradebook line items and sends XperienceED results to Moodle.
12. Synchronize Course Members
Use Group Members to provision Moodle course participants in XperienceED before students launch the activity. This avoids requiring each student to create a new XperienceED account or manually link an existing account during first access.
1. Open Group Members from the XperienceED instructor menu.
2. Review the Moodle users listed for the current course.
3. Select the checkbox for each user that should be created in XperienceED.
4. Optionally link a Moodle user to an existing XperienceED user. Use the Find user to link field to search for the existing account.
5. Click Sync Users after the desired users have been selected or linked.
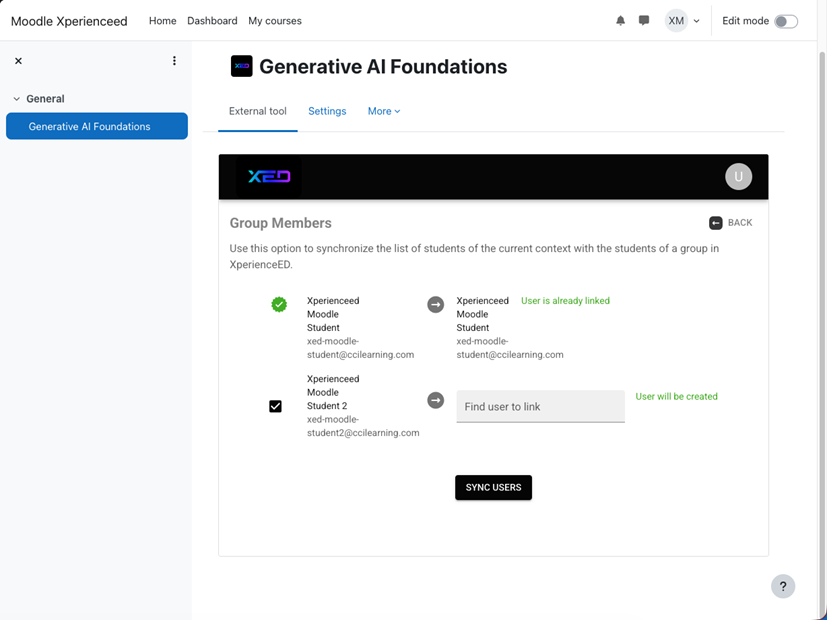
NOTE: A user already linked to an XperienceED account is identified in the interface and does not need to be created again.
13. Configure Grade Settings
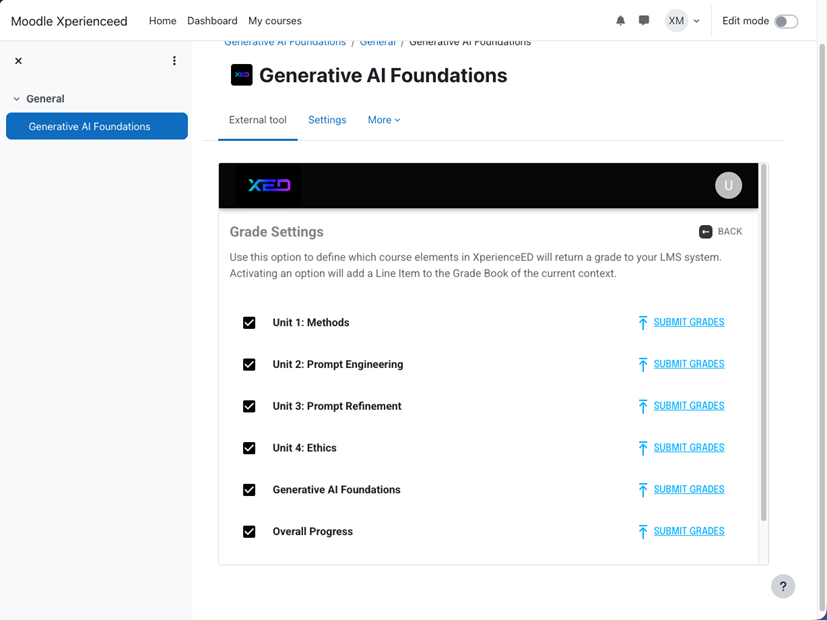
Grade Settings controls which XperienceED course elements create line items in the Moodle gradebook and provides controls for submitting results.
1. Open Grade Settings from the XperienceED instructor menu.
2. Select the checkbox for each course unit that should have a Moodle gradebook line item. Selecting an item creates the corresponding line item in Moodle.
3. Use Submit Grades for a unit to send the learners’ results for that unit to Moodle.
The screen may also include course-level result items such as the final course result and Overall Progress. These values are based on the weighting configured for the XperienceED course.
NOTE: Grade synchronization requires the LTI Assignment and Grade Services configuration described earlier in this guide and the Moodle activity option Allow XperienceED to add grades in the gradebook.
14. Recommended Validation Checklist
- XperienceED appears as an activated external tool in Moodle.
- The Moodle-generated Client ID has been provided to the XperienceED administrator.
- Services and Privacy settings match the values shown in this guide.
- The Moodle platform is associated with the correct XperienceED center.
- The Moodle course is linked to the intended XperienceED group and course.
- The desired XperienceED content is linked to the Moodle activity.
- Gradebook integration is enabled for the Moodle activity.
- Course members have been synchronized or linked to existing XperienceED users.
- Required grade line items have been created and a test grade can be submitted successfully.
15. Support Information
When contacting your XperienceED administrator for integration support, include the relevant Moodle Platform URL, Client ID, and Deployment ID shown by the integration. Do not send user passwords.
For platform registration issues, a screenshot of the message displayed by XperienceED can also help identify the Moodle registration that must be associated with a center.
Was this article helpful?
That’s Great!
Thank you for your feedback
Sorry! We couldn't be helpful
Thank you for your feedback
Feedback sent
We appreciate your effort and will try to fix the article